Google Search Console: The Ultimate Guide for 2025

Explore 'Google Search Console: The Ultimate Guide' to master the essentials of optimizing your website's performance. Learn how to leverage powerful tools and features to monitor site traffic, fix issues, improve SEO, and drive bulk traffic. Enhance your site's visibility on Google with expert insights and actionable tips.

 123
Google Search Console: The Ultimate Guide for 2025
Google Search Console: The Ultimate Guide for 2024
  • What Is Google Search Console?

    Google Search Console (GSC) is a free tool that helps you track and enhance your website's search performance and technical SEO.

    With GSC, you can monitor various metrics like search appearance and user experience, which can help you boost your site's traffic from Google.

    Here's what you can do with GSC:

    • Check your site's performance on Google
    • See which pages are indexed by Google
    • Submit sitemaps and URLs for crawling
    • Identify and fix technical SEO issues
    • And much more!

    In this guide, we’ll show you how to use Google Search Console to improve your SEO.

    Let’s dive in!

  • How to Set Up Google Search Console

    First, sign in to Google Search Console with your Google account.

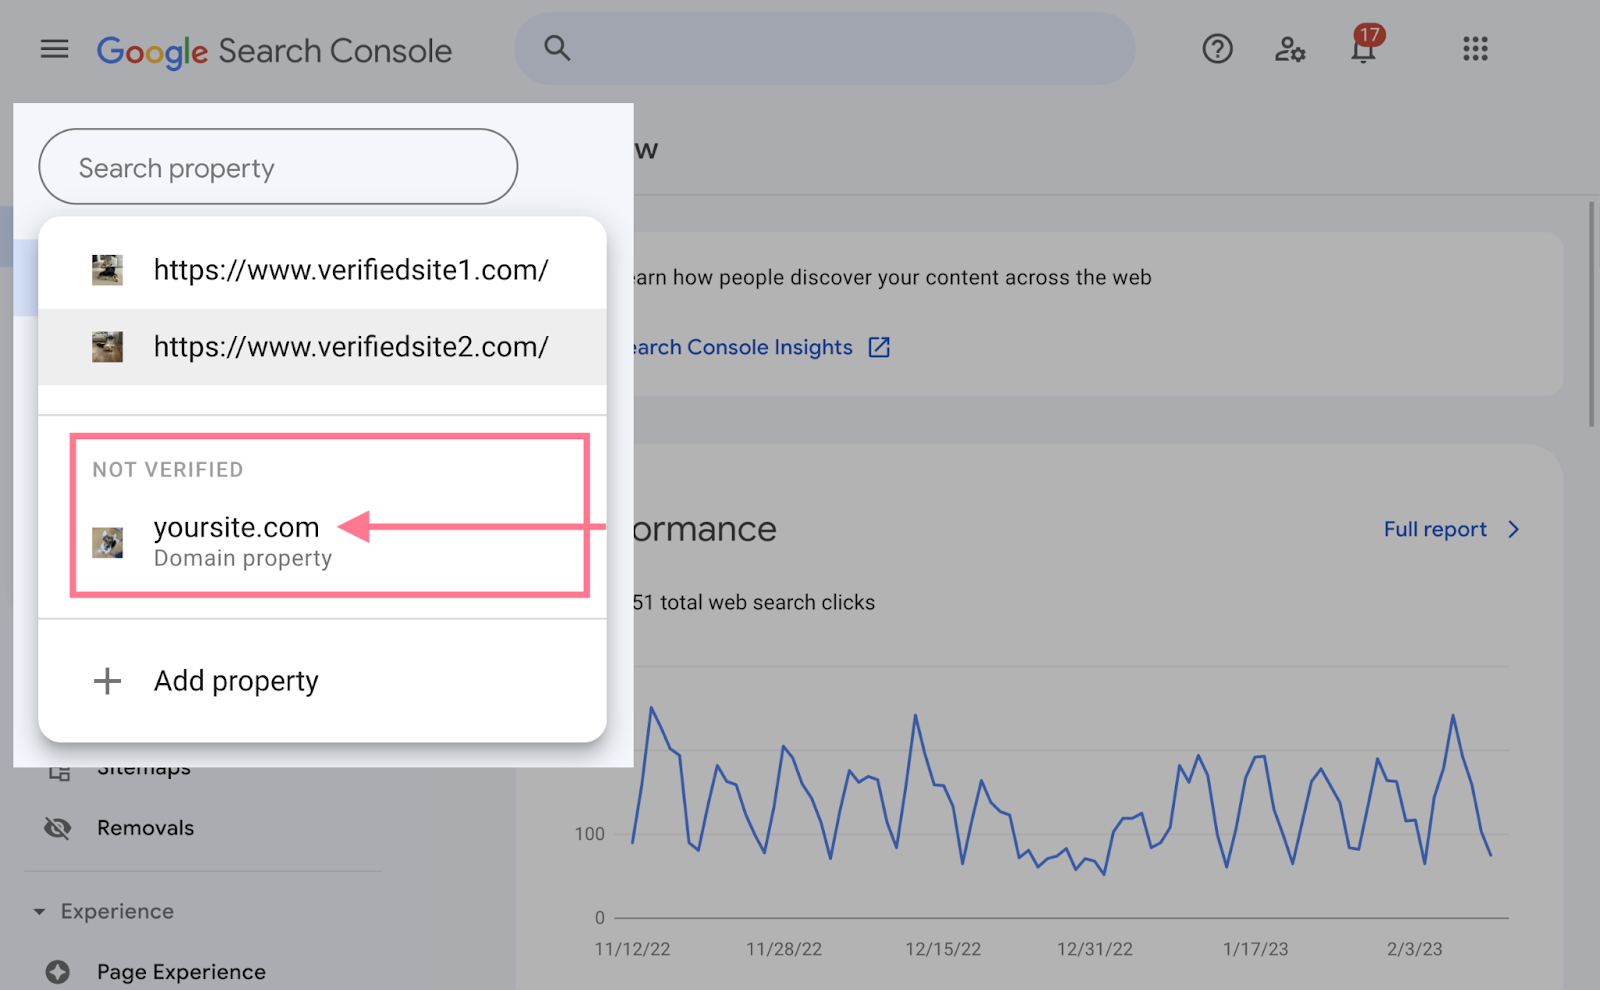
    When you log in for the first time, you'll see a pop-up asking you to add a property (your website).

    Google Search Console

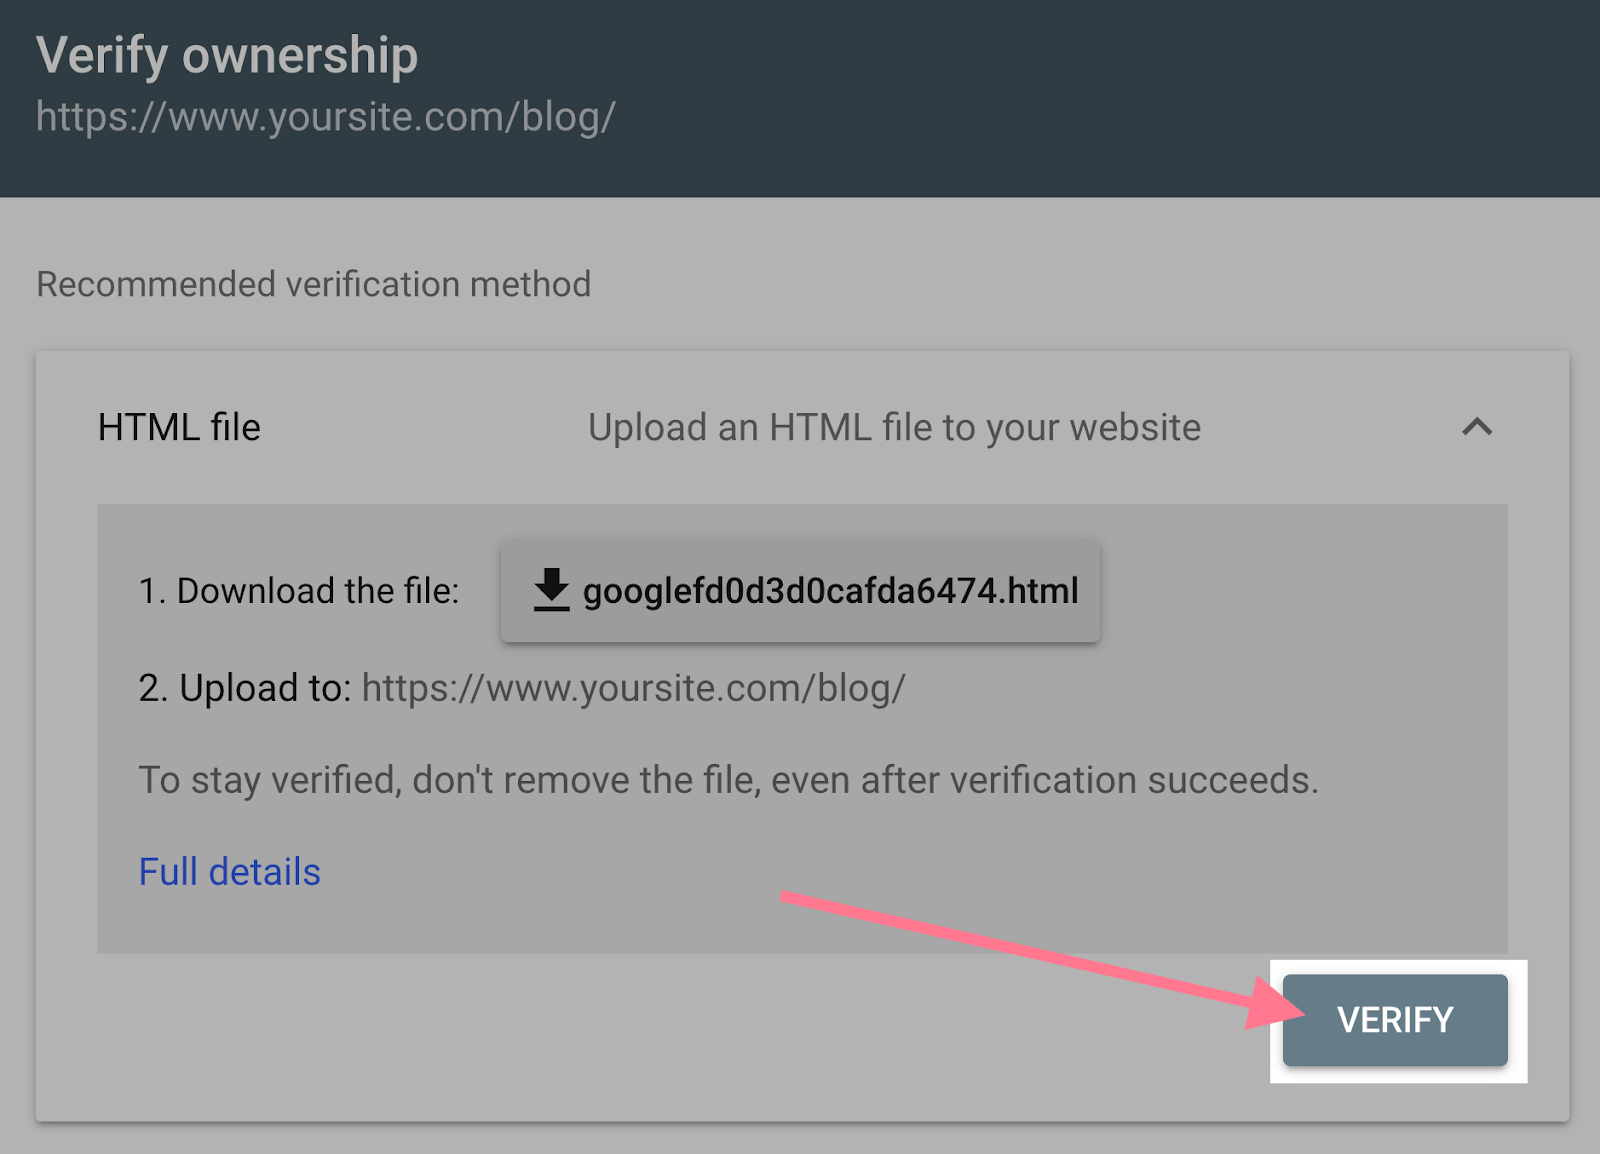
    You have two options here: add a domain or a URL prefix.

    Add a Domain Property

    Adding a domain property will give you the most comprehensive view of your website’s information.

    You'll receive data from all URLs under the domain name, including all protocols, subdomains, and paths.

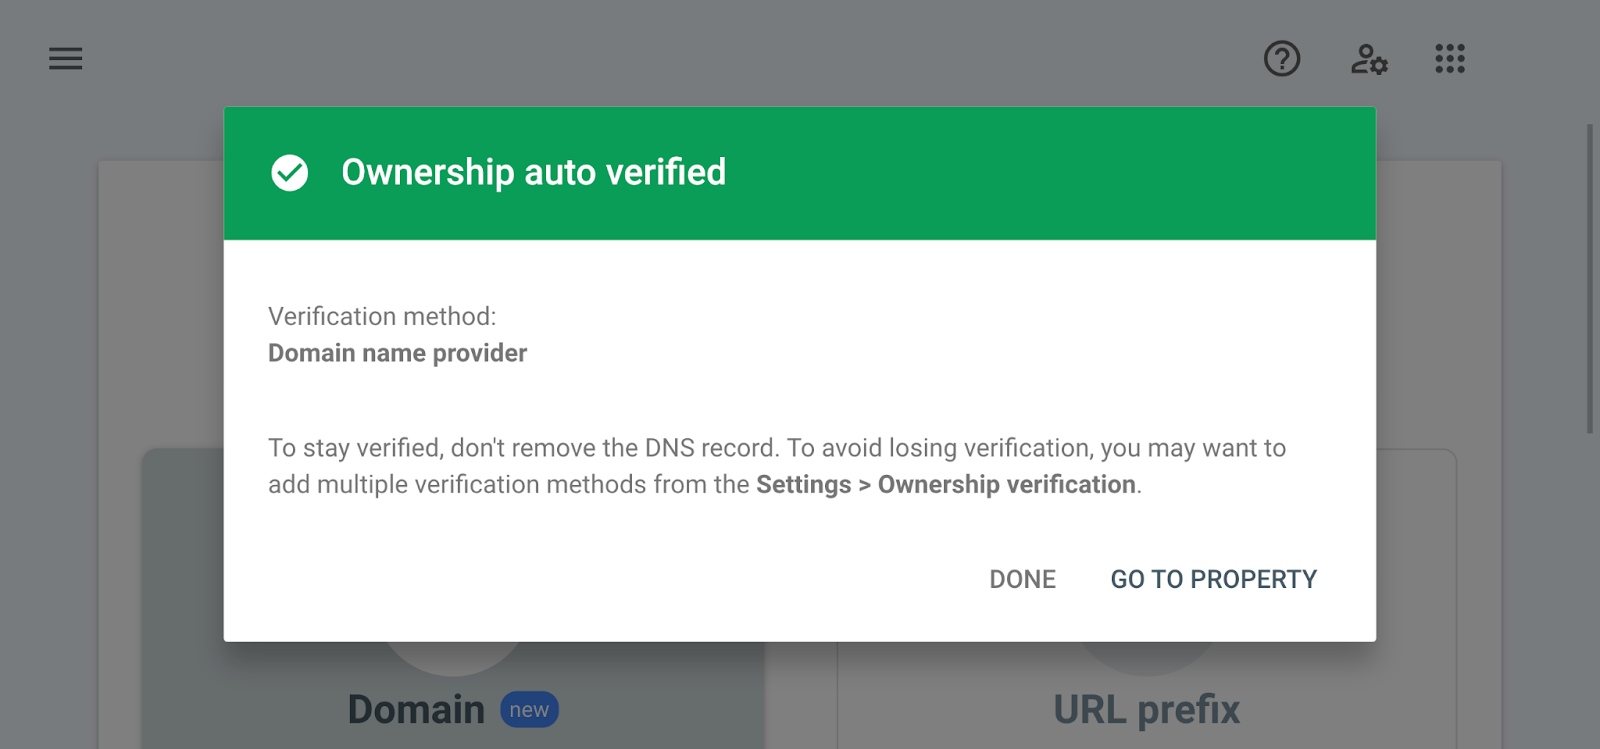
    To add a property this way, you'll need to verify it through your DNS (domain name system) provider.

    Here’s how to do it:

    1. Add your domain in the “Domain” option (without HTTP/HTTPS and www).
    2. For example, if your domain URL is “https://www.yoursite.com,” enter “yoursite.com” in the blank space provided.
    3. Click “CONTINUE.”

    This setup ensures you get a complete overview of your site's performance.

    Add a Domain Property

    Then, copy the TXT record from the instructions dialog box.

    GSC TXT Verify

    In a new tab, sign in to your account with your domain registrar. For this example, we'll use GoDaddy.

    Once you log in, access your DNS settings by clicking on the nine dots in the navigation bar next to your business name and selecting “Domains.”

    GoDaddy

    In your Domain Portfolio dashboard, select the three dots beside your domain name and click on “Edit DNS.”

    GoDaddy Edit DNS

    You should now be in the DNS Management window. Add a new TXT record by clicking “Add” in the DNS Records section.

    GoDaddy Add DNS

    A form will pop up. Fill it out as follows:

    • Type: TXT
    • Name: @
    • Value: [Paste the TXT record from Google Search Console]
    • TTL: 1 hour

    GoDaddy DNS Record

    When you’re done, click “Add record.”

    GoDaddy

    Now go back to Search Console and click “Verify.”

    GSC Verify TXT

    You may get a message that says "Ownership verification failed" at first. Don't worry if the verification doesn't work immediately.

    DNS record changes can take anywhere from a few hours to 48 hours to update. Wait at least an hour and try verifying again by selecting your website from the properties list.

    GSC

    Upon successful verification, you’ll see a confirmation message like this:

    GSC Ownership auto verified

    Or Add a URL Prefix Property

    Adding your site with the “URL prefix” option is useful if you want to view data for a specific section of your site, such as your blog.

    Start by entering your URL under the “URL prefix” option, then click “CONTINUE.” For example, you would enter “https://www.yoursite.com/blog/.”

    GSC URL Prefix Property Add

    Google allows multiple verification methods for a URL prefix:

    • HTML file (recommended)
    • HTML tag
    • Google Analytics
    • Google Tag Manager
    • Domain name provider

    GSC Verify Ownership

    For this example, we'll use Google's recommended "HTML file" upload method.

    Click on "HTML file" to expand the HTML file section, where you'll find the file download button.

    GSC HTML file Upload Verification

    Download your HTML verification file and upload it to the root directory (the top-most directory in your site hierarchy) of the website you want to verify.

    For example, if you want to verify “www.yourwebsite.com,” upload the file to the root directory of your homepage. If you want to verify “www.yourwebsite.com/blog/,” upload the file to the “/blog/” directory. This will also verify all the child directories under it.

    After uploading the file, go back to Search Console and click “VERIFY.”

    GSC VERIFY

    Similar to adding a domain property, you may need to wait for changes to take effect. If you can’t verify your site immediately, check back later and select the unverified property. Google Search Console will try to automatically verify you.

    GSC

    Tip: If you have any trouble adding or verifying a property, read Google’s guide to GSC verification.

  • Owners, Users, and Permissions

    You can have one of two roles in a Search Console account: owner or user.

    Your permissions depend on your role.

    Owners: Owners have full control over the property in Search Console. They can add or remove users, view all data, configure settings, and use all tools within Search Console. There are two types of owners:

    • Verified Owner: Verified owners have proven ownership of the property using a verification token (like an HTML file or tag).
    • Delegated Owner: Delegated owners are granted access by verified owners.

    Users: Users have more limited permissions compared to owners.

    • Full User: Full users can view all data for a property and take certain actions.
    • Restricted User: Restricted users have partial access and may not be able to view all available data.
    • Associates: Associates cannot directly access or view your Search Console account or data but can perform other tasks depending on the type of association.

    If you’re the property owner, you can add new users and grant permissions. To add a new user, navigate to “Settings” > “Users and permissions.”

    GSC User

    Click “ADD USER.”

    GSC Users

    Enter the new user’s email address and select the access type. Then, click “ADD.”

    GSC Add User

    The newly added user can now access your property in the Search Console.

  • How to Add a Sitemap to Google Search Console

    A sitemap file includes all the website URLs you want Google to crawl and index. This is important for Google to rank your pages. While Google will eventually crawl and index your site, submitting an XML sitemap directly via Google Search Console (GSC) can speed up the process.

    To submit your sitemap:

    1. Click “Sitemaps” on the navigation sidebar.
    2. Enter the sitemap URL in the provided field.
    3. Click “Submit.”

    GSC Sitemap

    Once Google is done processing your sitemap, you’ll see a message like this:

    Sitemap submitted successfully

  • Google Search Console Reports and Features

    Now that you’ve activated Search Console for your website, added users, and submitted a sitemap to Google, it’s time to explore the different reports and features available.

    Performance Report

    The “Performance” report provides data on how your website is performing on Google. It shows four key metrics:

    • Total clicks: The number of times people clicked on your site from the search results.
    • Total impressions: The number of times your site appeared in search results.
    • Average CTR (click-through rate): The percentage of impressions that resulted in a click.
    • Average position: The average position of your site in search results.

    To review these metrics for your site, click “Search results” from the sidebar navigation.

    Search results

    Below the chart, you’ll see a table displaying the queries, pages, countries, and devices driving traffic to your site. It also provides information on page experience and the number of clicks you received by date.

    GSC Performace Report

    Here are two ideas to consider when analyzing your Google performance data:

    Low CTR: If your pages rank well but don’t get many clicks, try writing better title tags and meta descriptions. This will make your pages more appealing to users.

    Missing Keywords: If you don’t rank for important keywords, your site might not have enough useful content addressing them. Improve your content strategy and produce quality content targeting the terms you want to rank for.

    If your website receives traffic from Discover and Google News, you’ll also see specific reports for these segments.

    The reports will look similar to the main performance report, showing metrics like clicks, impressions, CTR, and average position.

    GSC Discover

    URL Inspection Tool

    The “URL inspection” tool helps you check the index status of individual pages on your website and troubleshoot issues that may be preventing your page from appearing in Google’s search results.

    Access the tool from the top bar or by clicking “URL inspection” from the navigation bar.

    GSC Inspect URL

    To check the index status of a particular page, paste the full URL into the inspect search box and press enter. You will see results that include the following information:

    • Index Status: Whether or not the page is indexed by Google.
    • Last Crawl Date: The date and time Google last crawled the page.
    • Mobile Usability: Whether the page meets Google’s mobile-friendly criteria.
    • Structured Data: Whether the page includes structured data and any related issues.

    GSC

    The tool also lets you test live URLs, which allows you to see how a page appears to Googlebot.

    To use, click “TEST LIVE URL” at the top-right of the screen.

    GSC Test URL

    From the results page, click “VIEW TESTED PAGE” > “SCREENSHOT.”

    GSC Tested Page

    You can also use the URL inspection tool to request indexing for new pages on your site. Paste the full URL into the inspect search box and press enter. Then, click “REQUEST INDEXING.”

    GSC Indexing

    This can speed up the indexing process.

    Page Indexing Report

    The "Page indexing" report is located under the "Indexing" section. It shows which pages Google can find and index, as well as any related issues. Pages must be indexed to appear in search results, so it's important to avoid any indexation problems.

    To access this report, go to "Indexing" > "Pages" on the sidebar. You’ll see two tabs showing the number of indexed and non-indexed pages.

    Page Indexing Report

    If you notice a sudden drop in the number of indexed pages, it could be a sign that something is wrong.

    GSC PIR

    Scroll down to find out why your pages weren’t indexed.

    GSC

    There are many reasons why some of your pages may not be indexed. For example, your pages might be returning "Not found (404)" errors, or you might have accidentally added the "noindex" tag.

    This report will help you identify the problem. To drill down on a particular cause, click on an entry from the "Reason" column.

    GSC Page Indexing Error

    You’ll see a list of affected pages.

    GSC

    Along with a link to learn how to fix the issue at the very top.

    GSC

    If you implement any fixes, you can click “VALIDATE FIX” to help Google recognize the changes. This can prompt Google to re-evaluate and potentially index the affected pages.

    Sitemaps Report

    The “Sitemaps” report displays your sitemap submission history and alerts you to any issues with your submitted sitemap. To access the report, navigate to “Sitemaps” from the sidebar.

    Sitemap Reports

    You’ll find the following information:

    • URL: The URL specified when you submitted your sitemap
    • Type: The type of sitemap (e.g., XML, RSS, etc.)
    • Submitted: The date you originally submitted the sitemap
    • Last read: The last date Google crawled the sitemap
    • Status: The crawl status (e.g., “Success,” “Has errors,” or “Couldn’t fetch”)
    • Discovered pages: The total number of pages Google found in the sitemap

    Submitted Stemaps

    Make sure the “Status” column reads “Success.” This means your sitemap was successfully processed without errors.

    Here’s an overview of what unsuccessful statuses mean and how to approach them:

    • Has errors: One or more errors are present in your sitemap. Review the errors listed and read Google’s guide to learn how to fix each one.
    • Couldn’t fetch: Google Search Console could not fetch your sitemap. Navigate back to the “URL inspection” tool and perform a live URL test to investigate the errors.

    Clicking on your sitemap submission entry will lead you to a report for that specific sitemap.

    Page Index

    Clicking the “SEE PAGE INDEXING” button (highlighted above) will bring you to your sitemap’s “Page Indexing” report.

    SEE PAGE INDEXING

    The report tells you whether all your sitemap pages are indexed. 

    Page Experience Report

    The “Page Experience” report provides information about your website’s performance in terms of user experience.

    User experience is measured by the following criteria:

    • Core Web Vitals: Metrics from Google that measure loading, interactivity, and visual stability of webpage content.
    • Mobile Usability: Whether your site is usable on mobile devices.
    • HTTPS: Whether your site’s connection is secure.

    To review your site’s user experience, navigate to the “Page Experience” report in the left-hand sidebar.

    Page Experience

    The results are split between mobile:

    GSC Page Experience

    And desktop,

    GSC Desktop Page Views

    The percentage of “Good URLs” indicates how many URLs provide an optimal page experience to users. Look through each report to see where you fall short.

    For example, you might find that 15 URLs from your property failed the Core Web Vitals test, and 224 URLs failed the Mobile Usability test.

    GSC Page View Mobile

    Click on these numbers for a full issues report.

    GSC Web Vitals

    Here, we see that 15 URLs failed the Core Web Vitals test due to high LCP (Largest Contentful Paint) load times.

    GSC LCP

    Click on an entry to see which pages have the LCP issue.

    GSC LCP

    To fix Core Web Vitals issues, we recommend getting help from a developer on your team unless you’re highly experienced in technical SEO. After you’ve fixed the issue, alert Google of the change by clicking “VALIDATE FIX” at the top section of the error report.

    GSC

    Enhancements Report

    The “Enhancements” report shows information about any structured data Google detects on your website and whether any issues are present.

    Structured data provides Google with additional information about your page. Google uses this information to create rich results in the SERP, which can potentially improve CTR for your pages.

    Google lists the types of structured data it detects under the “Enhancements” section in the sidebar.

    It looks like this:

    Enhancements

    Click on a specific type for the full report. Here, we clicked on “Breadcrumbs.”

    The report indicates problems by showing "Invalid" items. Ideally, your "Invalid" items count should be zero. If there are any issues, the affected pages won’t appear as rich results in search results.Breadcrumbs

    The report indicates problems by showing "Invalid" items. Ideally, your "Invalid" item count should be zero. If there are any issues, the affected pages won’t appear as rich results in search results.

    Manual Actions Report

    Google issues a manual action if a website breaches Google’s spam policies. Websites with manual actions, or penalties, may rank much lower in Google search results or may not rank at all, leading to a significant loss of traffic.

    To check whether you have a manual action from Google, visit the “Manual actions” report in Search Console.

    Manual Actions

    If the report says “No issues detected,” you don’t need to do anything.

    However, if you see “Issues detected” in this report, you have a serious problem that needs immediate attention. Address each issue promptly.

    Learn how to address specific penalties in Google’s guide to the manual actions report.

    Links Report

    The “Links” report helps you track your external links, or backlinks, which are links on other domains pointing to your domain. Backlinks are an important Google ranking factor.

    To view this report, navigate to “Links” on the sidebar.

    GSC Links

    You’ll see your site’s total number of backlinks at the top:

    GSC External Links

    Under that, view your top linked pages—the ones receiving the most backlinks:

    GSC

    Plus, which sites are linking to you most:

    GSC

    As well as the most common anchor text people use when they link to you:

    Top Linking Text

    The “Links” report also shows which pages on your site have the most internal links, or links from pages on your domain. Internal links are important for SEO for two main reasons:

    • They help users and crawlers navigate your site more efficiently.
    • They transfer authority to other pages on your site, which can help them rank higher.

    To the right of the report, you’ll find information on your internal links, including the total number of internal links and your top linked pages.

    GSC Links

    Shopping Report

    The “Shopping” report is for online stores and product review sites that have implemented product markup on their websites. It shows data about issues with your product-related structured data.

    Depending on the structured data Google finds on your site, you’ll see a combination of the following reports:

    • Product snippets: Detects structured data issues for product snippets in search results.
    • Merchant listings: Detects structured data issues for free listings across Google.
    • Shopping tab listings: Detects structured data issues for items that appear in the Shopping tab in Google Search results.

    Navigate to the specific report from the sidebar to review these details.

    Shopping Report

    And you’ll see whether there are any “Invalid” items.

    GSC Shopping Reports

    If “Invalid” items are present, the affected pages won’t appear as rich results on Google. Review the "Invalid" items in the report to identify the errors.

    After fixing the issues, use Google's Rich Results Test to check your structured data code. The tool will let you know whether your new code is working and whether your entry is eligible for a rich result.

    AMP Report

    AMP (formerly known as Accelerated Mobile Pages) is an HTML framework developers use to create lightweight, fast-loading web pages.

    When Google detects AMP on your site, it creates a report in the Search Console detailing those pages and any issues preventing Google from indexing them. To access the report, click “AMP” from the navigation sidebar.

    The summary report classifies your pages into two categories:

    • Valid pages: These pages are free from AMP-related issues and can appear in search results.
    • Invalid pages: These pages cannot appear in search results due to certain issues.

    Scroll down to see the list of issues with your AMP pages. Fix each issue so your AMP pages can start appearing in search results. We recommend asking a developer for help unless you’re an expert in this field.

    After you’ve fixed the issues, click “VALIDATE FIX” to ask Google to confirm your fixes.